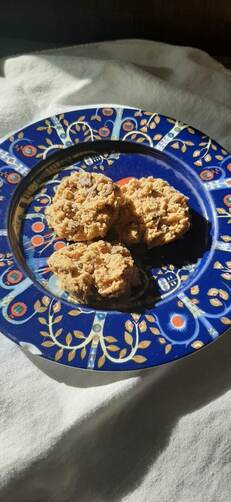
 I made these cookies for my 17-year-old one morning this week as an alternative to packaged granola bars for breakfast. They go together quickly (5 minutes to mix up, 10 minutes to bake), are packed with protein, fiber, and fat to keep him full for the morning, and are easy to grab and go before a busy day. I'm calling them breakfast cookies because I cut down on sugar from a typical cookie recipe, and added in some oats. A bit of a stretch, but in terms of nutrient density, it's better than a donut or a bowl of cereal! Compared to a packaged breakfast bar, this recipe has only 7 ingredients as opposed to 20 in the commercial version, the same number of calories, more fiber, the same amount of protein, and less sugar (see nutrition facts label for this recipe below). It contains no soy (common in packaged bars) and none of the mysterious "natural flavors" so common in ingredient lists. It also doesn't require plastic packaging, and contains no preservatives. The fats are all good for you (nuts and eggs) , and you can control whether or not the ingredients are organic. It's also more economical. Ingredients: 1 cup peanut butter (other nut butters would work as well) 1 egg 1/2 cup sugar 1 tsp vanilla 1/2 tsp baking soda 1/2 cup raw oatmeal 1/2 cup chocolate chips Preheat oven to 375 degrees F. 1. Combine all ingredients and mix well. 2. Drop dough by heaping tablespoons onto a cookie sheet. This should make 12 good-sized cookies. 3. Bake for 10 minutes. 4. Remove onto a cooling rack. Let cook for 5-10 minutes before eating. Note that these will be soft and crumbly when warm, and will set up once they cool a bit. Handle them gently when placing on the cooking rack. 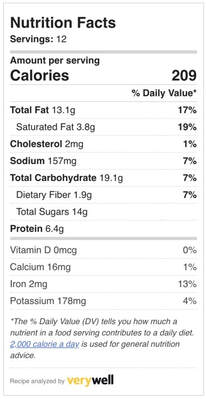
1 Comment
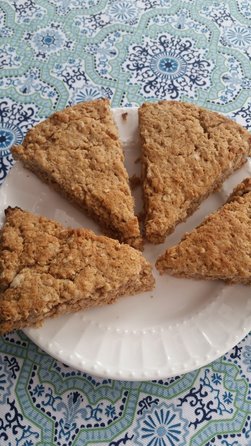 This is a simple recipe that goes together quickly, nice on a lazy weekend morning. I wanted to make a maple glaze to top these, but discovered ants in the confectioner's sugar. Gross. Instead, I mixed a few tablespoons of maple syrup into half a stick of softened butter. It makes a perfectly sweet topping for these slightly savory scones. This is a gluten-free adaptation of a conventional recipe - it will come out great made with regular flour in place of the gluten-free blend, if you aren't avoiding gluten. Enjoy! Combine the following in a large mixing bowl: 1-1/2 cups gluten-free flour, plus 1.5 tsp xantham gum if not included in blend 1/4 cup sugar 1 Tbsp baking powder 1/2 tsp salt 1-1/4 cups old-fashioned oats (certified gluten-free variety) 1 tsp cinnamon Once well combined, add the following: 1 large egg 10 tbsp butter, melted 1/3 cup milk 1 tsp vanilla Stir until a sticky batter forms. Dump batter onto a cookie sheet and using your hands, press out into a circle, about 1 inch thick. Use a knife or spatula to cut into 8 wedges, but leave them connected in the original circle shape. Bake at 450 degrees for 15 minutes, or until wedges can be pulled apart and look baked through the center. Serve warm with maple butter. 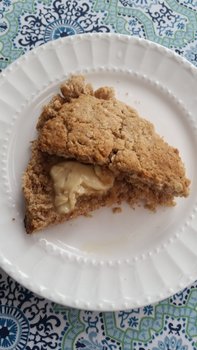 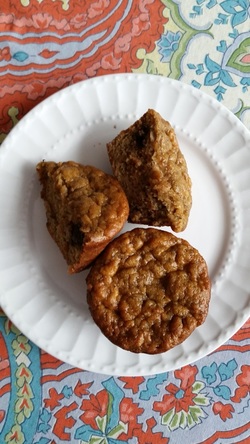 Today was supposed to be spent doing a 12-mile loop hike in the mountains, tagging two more 4,000 footers. But it rained. And yes, we could have gone in the rain. But it's so much more fun on a nice day. So it turned into a (much needed) day at home. Having just finished my first week at a new job, I needed some down time.
In the midst of working through a large sorting/cleaning/moving project, I decided to make some banana muffins. What I really wanted was banana bread, but even the GF flours bother me sometimes, so I decided to go with a grain free recipe. This is one that I've made once before, but I tweaked it a bit and it came out much better. The coolest thing about this recipe is that it has NO FLOUR. None. Not coconut. Not almond meal. Not rice flour. So I don't have to worry about the nut issue (son is allergic to tree nuts) or the "funny taste" of coconut that both kids complain about. This is a 6-ingredient recipe, and you won't believe it unless you try it. I throw my browning bananas into the freezer and save them for smoothies or baking. Today I happened to have 3. They thaw very quickly if you put them in a bowl of water...it took about 15 minutes this morning. I used peanut butter (not paleo, strictly) because we have a kid with tree nut allergies, but I'd love to try this with cashew or almond butter. And I used maple syrup that my older son made this spring when he and a friend tapped some trees on the property and boiled it down. Ingredients 1 cup nut butter 1 1/2 cups mashed bananas 1 tsp baking soda 1 tsp vanilla 3 eggs, beaten 1/3 cup maple syrup or honey 1 cup chocolate chips (optional) 1. Combine all ingredients in a mixing bowl. Stir until well combined. 2. Grease 12 muffin tins, and fill 3/4 full with batter. 3. Bake at 350 degrees for 20 minutes. The muffins will need to sit and cool for about 15 minutes until you attempt to eat them. They are initially quite soft, but will become a consistency such that you can pick it up and eat it just like a regular muffin. If you can't wait that long, I recommend a plate and a fork (from personal experience...). 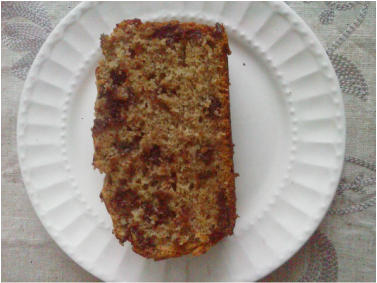 Blizzard = two days snowed in at home = banana bread. Naturally.
This is adapted from the recipe found in The Moosewood Cookbook by Mollie Katzen, one of my favorite vegetarian cookbooks. I made it milk-free and allergen-free. I also cut the recipe in half and added chocolate chips. This is dairy-free. If you are opposed to using grains at all, try it with coconut or almond flour. This is very yummy warm with coffee. Especially while watching a movie on a Wednesday morning, wrapped in a cozy blanket on the couch, watching the snow come down outside the window. Ingredients 3/4 cup melted butter 3/4 cup sugar (use whatever type you like) 2 eggs 1 tsp vanilla 2 cups GF flour, plus 1/2 tsp xantham gum if your blend doesn't include it (or wheat flour if you aren't GF) 1/2 tsp salt 1/4 tsp baking soda 1 1/2 tsp baking powder 1 tsp cinnamon 1 cup mashed banana soaked in 1/2 cup black coffee (do not even think about skipping this bit) 1. Combine melted butter, sugar, eggs, and vanilla in a mixing bowl. Mix until light and fluffy. 2. Meanwhile, mash bananas in a separate dish and mix in black coffee. I used cold coffee that was leftover from the morning. Let it soak while you finish combining dry ingredients. 3. Combine all dry ingredients in a separate bowl. (Original recipe calls for sifting, though I skipped the sifting myself. This is a bad habit I have - skipping the sifting - which I blame my mom for. Thanks, mom. The bread still came out light and fluffy, so I think the woman may have a point.) 4. Combine dry and wet ingredients. Mix well. Add bananas and coffee, and combine. I folded in 1 cup of chocolate chips at this point. Pour into a well-greased loaf pan. Bake at 350 degrees for 40 minutes. Check to make sure it's done in the middle. My loaf this morning required another 15 minutes. This was one of the better GF quick bread recipes I've tried. Enjoy! 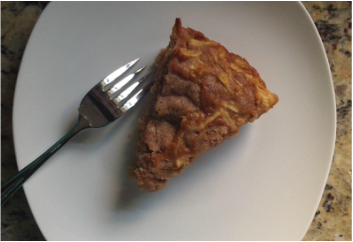
It's apple season in New Hampshire! Last weekend, I picked up a peck of "seconds" at a local orchard for $9. Now the trick is to figure out how to use a peck of apples. I found an apple coffee cake recipe and adapted it to make it gluten free, and also tweaked it to remove the apple chunks that my kids object to. It turned out really nicely - a strong apple-y taste, and very soft and moist. This is gluten-free and potentially dairy free, as detailed below.
Ingredients 1/4 cup butter 3/4 cup brown sugar 1 large egg 1/2 cup yogurt (use 1/2 cup cultured vanilla coconut milk, Greek style, to be dairy free) 1 tsp vanilla 1 cup gluten free flour blend, or 1/4 cup tapioca starch, 1/4 cup potato starch, 1/2 cup brown rice flour, and 1/2 tsp xantham gum 1 tsp cinnamon 1/2 tsp baking soda 1/4 tsp salt 3 cups grated apples (I used McIntosh) 1. Butter a 9x9 baking dish or a 9-inch pie plate. 2. Mix together butter, brown sugar, and egg until smooth. Add yogurt and vanilla and combine. 3. Combine dry ingredients (flour through salt) in a separate bowl, then stir into wet ingredients. 4. Fold in grated apples. Pour into prepared pan. Bake at 350 degrees for 35-40 minutes, or until set. This is very apple-y, so a toothpick test might look underdone, but it probably is fine. Let it set up for 10-15 minutes before cutting. 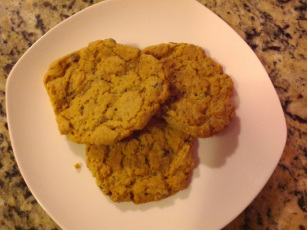 Not much to say about this recipe, besides that it is simple (5 ingredients), delicious, a crowd-pleaser (just don't tell people they're gluten-free), and highly adaptable. The original recipe - and the one I usually make - calls for peanut butter. I found it on the Whole Foods site a few years back while searching online for a GF peanut butter cookie recipe. Try it with any form of nut butter and see what happens. Add chocolate chips, or don't. Throw in some oats or some chia seeds. The nutritional information for these cookies will rival any granola bar or protein bar that you might buy at the grocery store, but you get to have control over the quality of the ingredients. These are great for dessert, or thrown into lunches, or stashed in a backpack to eat during a long hike. These are not crumbly or saliva-sucking like some GF baked goods can be.
Ingredients: 1 cup nut butter (use a "natural", lower sugar form if possible) 3/4 cup sugar (or equivalent baking sweetener of your choice) 1 egg 1 tsp vanilla (this is actually optional) 1 tsp baking soda Variations: -Add chocolate chips -Use almond butter and add white chocolate chunks and dried cranberries or blueberries -Add oats, seeds, or chopped nuts Combine ingredients. Drop by spoonfuls onto cookie sheet. No need to flatten. Bake at 350 degrees for 8-10 minutes. They will still look a little underdone at this point, but take them out anyway and let them cool. If you overbake them, they get dry and crumbly. 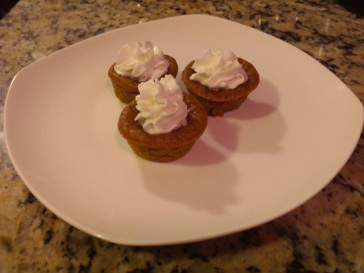 Fall time = pumpkin time, right? Pumpkin is not only delicious, but also full of nutrients including vitamin A, B vitamins, and minerals such as copper and potassium. I love pumpkin baked goods, but rarely bake them myself anymore. I saw a recipe shared on Facebook this week that looked so delicious, I thought I might try it. It was a "conventional" recipe, but I have adapted it to be dairy- and gluten-free.
These muffins come out like the inside of a pumpkin pie, so if you don't like super moist cakes/muffins, this probably isn't the recipe for you. They are firm enough to hold onto and eat like muffins, but just a tad gooey. I LOVED them, as did everyone in the family, but I can imagine that there are some people who would not enjoy their texture. Saturday turned out to be a lovely fall day, cool and crisp, with some rain in the mix later in the day. It was a perfect day for baking, especially something involving pumpkin and cinnamon. I found that I had already packed my muffin tins away, but still had a mini-muffin tin to use, so that's what I did. Turns out they packed really well and tasted great at the summit of a mountain today, and were much easier to share due to their small size. This recipe would be easily "paleo-ized" by using almond meal or coconut flour in place of the GF flour I chose. Ingredients Pumpkin puree, make your own or buy a 15-oz can (I bought the can.) 3/4 cup of your favorite sweetener (I used 1/2 cup white sugar and 1/4 cup brown sugar) 2 large eggs 1 tsp maple syrup (original recipe calls for vanilla but I was out...) 3/4 cup coconut milk (from a can, stirred well before measuring) 2/3 cup flour (I used a GF blend that has xantham gum included, but remember to add 1/2 tsp xantham gum in addition to your favorite GF flour if not in the mix) 1 tsp cinnamon 1/2 tsp nutmeg (if desired) 1/4 tsp ginger (if desired) 1/4 tsp salt 1/4 tsp baking powder 1/4 tsp baking soda Preheat oven to 350 degrees F. Butter 24 mini muffin tins (or 12 regular sized muffin tins). Pour batter into tins until about 2/3 full. Bake for 25-30 minutes, checking occasionally for doneness. These will be very, very moist, but if you check them and they still seem too underdone, put them in for 5 minute intervals. Let stand and cool for at least 20 minutes, then remove from pan and serve. You can top them with whipped cream, or whipped coconut cream if you are dairy-free. How to make coconut cream, you ask? Buy a can of coconut milk (NOT "lite"). Scrape the solid layer off the top and add to a mixing bowl. Add about 1 Tbsp sugar. Whip with an electric mixer on high speed for several minutes, until peaks form in the cream. Serve as a topping for your pumpkin pie bites. This recipe is adapted from one published by King Arthur (as in the flour company). I adapted it to ingredients I had on hand and it turned out amazing. I've blogged it before and I'll blog it again - you can make just about anything in terms of gluten-free baked goods if you have these four items in your pantry: brown rice flour, potato starch, tapioca starch, and xantham gum.
I used a few different techniques from the original recipe - grating the butter rather than cutting it into the dry ingredients, and using ice water at the end rather than cold tap water, a secret learned from my mom via my Grandma Violet. See below for details. I used it to make an apple pie (not primal at all) after spending part of a morning picking early apples (totally primal) with the family. The pie was delicious, the crust was flaky and tender, and it was enjoyed by all who tried it. I would venture to say that if I hadn't known better, I would have never guessed that it wasn't gluten-full. It was even good the next day. I can highly recommend this recipe. This is supposed to be a single crust recipe for a 9-inch pie, but I actually managed to get a top and bottom crust out of it. Pie Crust Ingredients 3/4 cup rice flour 1/4 cup potato starch 1/4 cup tapioca starch 1/2 tsp xantham gum 1/2 tsp salt 6 Tbsp cold butter 1 large egg 2 tsp apple cider vinegar 3 Tbsp ice water 1. Mix dry ingredients together (rice flour through salt). 2. Grate the butter into the dry ingredients. Make sure it is good and cold before your start. Work quickly. Toss with a fork until butter is coated with dry ingredients. 3. In a small cup, whisk egg and vinegar together until foamy (about 90 seconds). Mix into dry ingredients with a fork. 4. Add 3 Tbsp of ice water. I make ice water in a measuring cup or mug, let it sit until it's nice and cold, then measure out the desired portion. 5. Mix well to combine. Form a ball. I like to use my hands at the end. My grandmother claimed it was her cold hands that made her pie crust come out so well, so I actually run my hands under cold water or use a bag of frozen veggies (briefly) to chill my hands before this step. Silly. But it's hard to argue with results. 6. Chill ball for 1 hour in fridge. Take out 10-15 minutes before using. I rolled mine out on top of saran wrap, sprinkled with ample tapioca starch, then flipped it into the pie plate. Apple Filling 8 cups sliced apples 1 cup sugar (I used raw) 1/4 cup rice flour 1 tsp cinnamon 2 Tbsp butter Toss everything together in a bowl. Dump into crust-lined pan. Dot with butter, if desired. Put top crust on apples. Bake at 425 degrees for 15 minutes. Reduce heat to 350 degrees and bake for an additional 40-45 minutes. 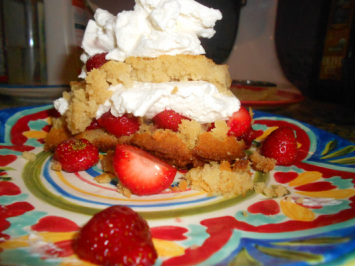 We are fortunate in our new location to live right around the corner from a good-sized farm. One of the crops they grow each year is strawberries. On the way home from school one day, we stopped to pick a few pounds. It was one of those days that I would have loved to bottle up and store - blue sky, puffy clouds, warm breeze, the satisfaction of picking our own food...definitely a special experience. We brought them home and ate a bunch right away, then after dinner, someone happened to mention strawberry shortcake.
We generally steer away from large desserts most nights. But having several pounds of fresh-picked strawberries in the fridge, along with a carton of whipping cream, it seemed like too good an opportunity to pass up. I made a gluten-free vanilla cake, and my son took care of the whipped cream using the Kitchen Aid. It was delicious - a nice indulgence on a warm, breezy June evening. The cake only takes 30 minutes to bake, so the strawberries and whipped cream can be prepared while it bakes. I never buy GF baking mixes, preferring to use my standard recipes and substitute my own blend of flours. I use only brown rice flour, tapioca starch, and potato starch as a substitute. This works well for cookies, cakes, breads, pancakes/waffles, and quick breads. If you have the 3 flours above, as well as xantham gum, you can make great GF baked goods without spending a lot of money. A more primal/paleo approach to this dessert would be to make whipped cream without sugar added, or even making whipped coconut cream, and serve with strawberries, skipping the cake. That would be more of an every-day indulgence, and much lower in carbs. This recipe would make enough to serve 6, given a serving size equivalent to that in the photo. GF Vanilla Cake 1/2 cup brown rice flour 1/4 cup potato starch 1/4 cup tapioca starch 1/2 tsp xantham gum 1/4 tsp salt 1/2 cup sugar 1/4 cup butter 1 egg 1 tsp vanilla 1/2 cup milk 1. Mix dry ingredients together. 2. In a small bowl, melt butter, then add in egg, vanilla, and milk. Beat together. Pour wet ingredients into dry ingredients and mix until well combined. 3. Pour batter into a 9-inch square or round cake pan. Bake at 350 degrees for 25-30 minutes. Whipped Cream 1 cup of heavy or whipping cream 1 tsp vanilla 2 Tbsp sugar Add ingredients to a mixing bowl. Using a hand mixer, stand mixer, or whisk, beat until stiff. Assembly: Cut square slices of cake. Slice in half through the middle. Layer cake, strawberries, and cream. In February of 2013, we lost a great man. Ken's uncle, Don Jacobs, was much loved and will be missed. He was stricken with ALS, officially diagnosed in October 2012. It is still hard to believe how quickly he slipped away. More thoughts/memories follow the recipe.
We will remember Uncle Don for many things, but one of my favorite memories was his ability to whip up a quick batch of chocolate chip cookies while we were visiting. He inspired me, early on, to memorize the same recipe he used (Toll House) and to be able to make a batch while carrying on a conversation so that guests hardly noticed what was happening until lovely, warm cookies appeared before them, just like Don did for us. Uncle Don's Chocolate Chip Cookies (adapted to be GF) 2 1/4 cups flour (I use 1 1/4 cup brown rice flour, 1/2 cup potato starch, 1/2 cup tapioca starch, and 1 tsp xantham gum in place of wheat flour) 1 tsp baking soda 1 tsp salt 3/4 cup brown sugar 3/4 cup white sugar 2 eggs 1 tsp vanilla 1 cup butter chocolate chips 1. Soften butter. Add sugars, eggs, and vanilla. Beat until well combined. 2. In a separate bowl, mix dry ingredients. Add to the previously combined ingredients. Mix well. Add chocolate chips and stir until evenly distributed. 3. Place by spoonfuls onto cookie sheets. Bake at 375 degrees for 8-10 minutes. Dear Uncle Don, I don’t understand why it has to end this way for you. I would have pictured you going in another way – you have always been so vigorous and capable and strong. I find it particularly cruel that YOU have been stricken with this disease, as I have never known you to hold still for more than 5 minutes. Now you can’t move at all. I want you to know how I will remember you, because I can’t align how you look now, your physical shell, with the man you actually are, with your soul. I will not remember you stripped of your faculties as you have been for this tiny percentage of your life, but rather as you have been for the 18 years I have known you. You were the first of Ken’s family that I ever met. Because you lived here in the Boston area, we could visit often. I met you just a few months after Ken and I had met. I think of us, showing up on the doorstep of one of your beautiful homes, the two of us dressed in thrift shop khakis and corduroys, fleece and hiking boots, Ken’s homemade hats, two college kids who had the world figured out. I remember you with your open arms and your lack of judgment. You always seemed interested in what we had to say, always encouraged us. You have always been an incredible host, a wonderful cook, a fantastic conversationalist. It was never awkward. You became part of our story. I can’t recall our early days of dating without thinking of you. You and your family embraced us like one of your own kids. You and Ken bear an uncanny resemblance to one another, and it was always definitely “family time” when we got together. You were one of the first in the family to know that Ken planned to propose to me. Never, at least to our faces, did you question that choice, even though we were young, even though we weren’t through college yet, even though we had just met. I remember support. I remember celebration. I remember you and your family at the wedding, joining in with us. We visited fairly often over the years. Sometimes we babysat your youngest daughter, other times we celebrated holidays together. Sometimes we just stopped by, just because. We were always welcome. We brought the boys to visit when they were new babies. You came up to see our first house. We spent Thanksgivings together. When we decided to move to Turkey, you expressed concern, but encouraged and supported us despite that concern. You were kind and generous in spirit, even though you didn’t always understand our choices. When we came home for summer visits, we always made time to see each other. And in the time that we’ve been back, just over a year and a half now, we have had the privilege of multiple visits. Even though our visits over the years have been in a number of homes, under a number of circumstances, this is how I see you: standing in the kitchen, cooking (and talking) up a storm, pouring me a glass of wine (you always had a bottle of white chilled when I came over), putting out yet more and more crackers and cheese, chips and salsa, veggies and dip, teasing the boys, but pampering them with special seats in your leather chairs and movies on demand, letting them eat in the living room. (Remember how Patrick ate salad at your house? And loved it? It’s the only salad he’s ever eaten gleefully like that.) I will always see you standing over a mixing bowl, making chocolate chip cookies, or preparing a pan of roasted asparagus, or getting a steak ready to throw on the grill. You, on your feet, talking, cooking, laughing, joking. That’s how I choose to remember you. Even now, I have dreams that you are talking to me, you have your legs and your voice back. You can swallow and eat again. And in my dreams, I am so happy to see that you’ve been restored. When I wake up and I know it’s not true, I remember to pray. I pray that on the other side of this nightmare, you will have peace and comfort again, an end to this illness, and an end to this grief. We love you. Thanks for the memories. You will be remembered in our home with spontaneous cookie baking, a glass of wine on a Sunday afternoon, a dash of herbs de Provence on a pan of asparagus drizzled with olive oil. You will be remembered in the beautiful places where we met up from time to time: Newburyport, Portsmouth, downtown Boston. You will be remembered by a nephew, his wife, and their two sons who so enjoyed time with you. You will be remembered by Noah, who sleeps with your leather flight bag next to his bed, your books and tapes and headphones arranged on his bedroom shelves. You will be remembered into the future, and even more so when we will try to meet our college-aged sons with the same lack of judgment and the same unconditional love and hospitality that you extended to Ken and me. This is for sure: You will never be forgotten. Thanks for the memories. We look forward to hanging out again one day. |
AuthorI'm Emily. I currently work in online education management, but I also have a Masters degree in Nutritional Sciences (my true passion). In addition, I am a mom, cook, avid reader, novice gardener, and enjoy all kinds of outdoor activities. On my blog, you will find articles on food, fitness, weight management, and eating issues. ALL recipes on my blog are gluten-free. Many are low-carbohydrate. Most are grain free. Enjoy! 
Categories
All
Archives
June 2019
|
